Automate a desktop app
Kitewell can use the apps on your computer the way a person does: it looks at the screen, then clicks and types. You describe the task in ordinary words — “Create an invoice for %client% and save it” — and a model works until it is done.
This is the job desktop RPA tools do — driving an app that has no API — with nothing recorded by hand and no selectors to maintain. A model works out the task the first time, and later runs replay what it did without the model while the app still matches: by the app’s own elements on Windows, and by matching the screen on macOS. When the app no longer matches, the model is asked again for what changed.
That reaches the accounting package or the ERP client that has no API and no web version:
- Copy each row of a spreadsheet into an accounting or sales app.
- Read a figure from a desktop dashboard and pass it to the next step.
- Export a report from an app that only exports through its menus.
- Check that an app shows what it should after an update.
It works on macOS and Windows, on the screen in front of you. While it runs it takes the mouse and keyboard, and it gives them back the moment you touch them.
What you need
Section titled “What you need”A model that can operate a computer, such as Gemini 3.6 Flash, Claude Sonnet 5, or GPT-5.4. Add one under Agents & models, then pick it in the step’s Model, or set one for the whole workflow in Settings → Execution & retries → Default model for browser and desktop steps. Another vision model that can call tools still works. On Kitewell Personal and Team, Kitewell’s included model works too; on the free plan a desktop step needs a model of your own. How the model uses the desktop, under Desktop settings, is normally Automatic; Plain tools, for any vision model makes a model without a computer-use tool work through plain click-and-type tools — more slowly, and less reliably.
Permission to use the screen. Open Device settings → Desktop automation. Each row says Not checked until you choose Check desktop access, and then Ready or Needs attention.
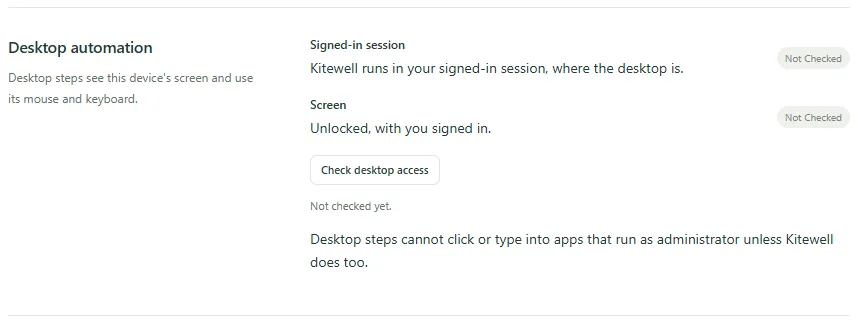
- On a Mac the rows are Screen Recording and Accessibility. The first check asks macOS for both, in dialogs that name Kitewell Agent — Kitewell’s background service, which is what actually drives the screen. Allow them, and Open System Settings takes you to the right pane if you dismissed a dialog.
- On Windows the row is Signed-in session: Kitewell has to run in your signed-in session rather than as a Windows service. A desktop step also cannot click or type into an app that runs as administrator unless Kitewell does too.
An unlocked screen with you signed in. Desktop steps use the screen you see, so a locked or sleeping computer cannot run them — including on a schedule.
Build your first desktop step
Section titled “Build your first desktop step”This example opens the accounting app, finds a client’s latest invoice, and hands its number to the next step.
-
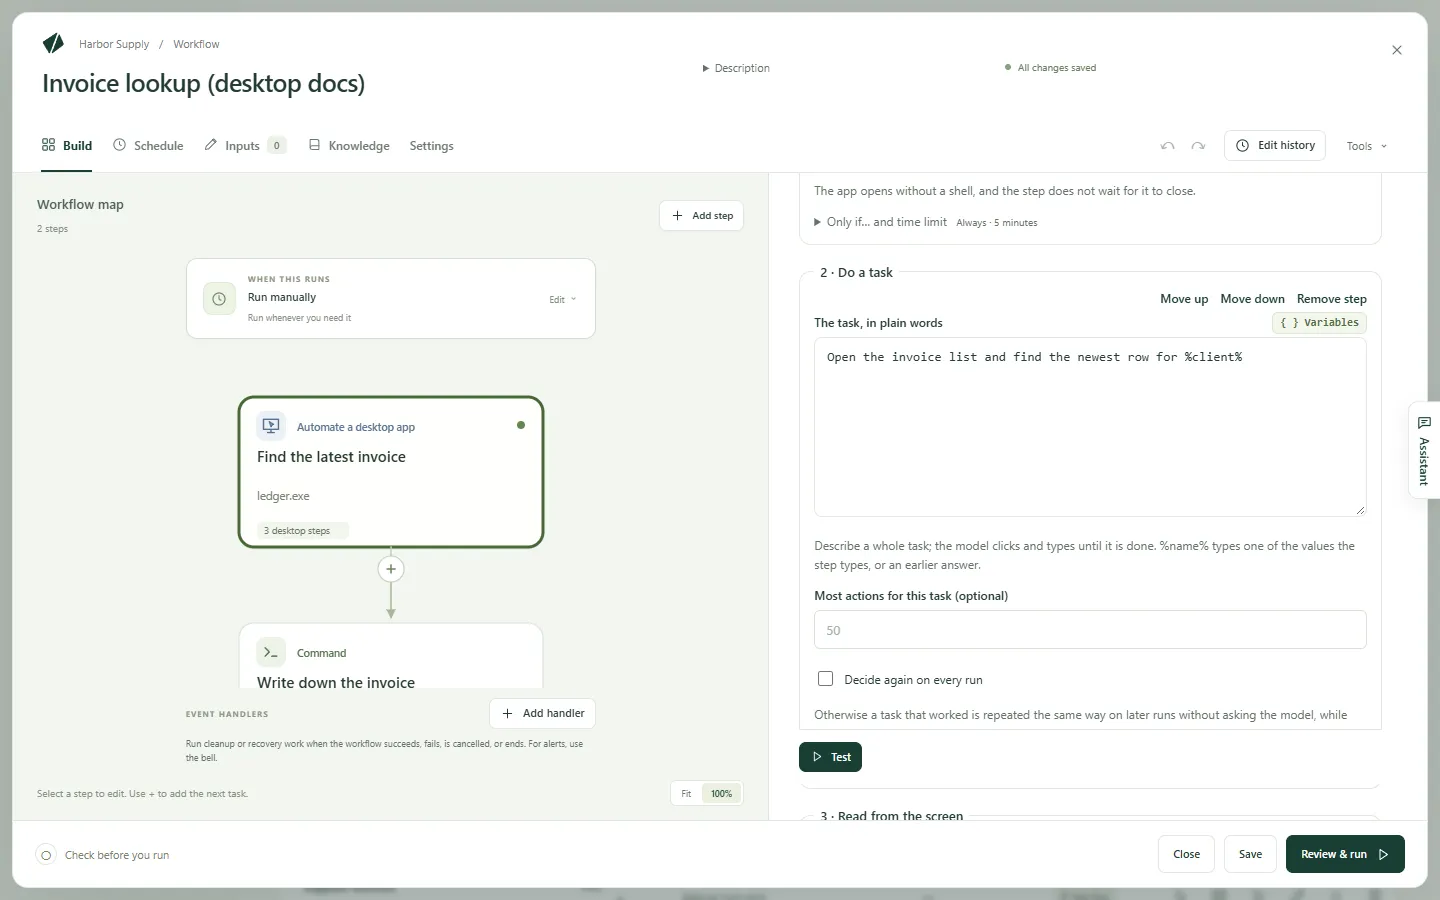
Open a workflow, choose Add step, and choose Automate a desktop app. Give it a Step name such as
Find the latest invoice. Under Technical settings, Step identifier is the short name later steps use to read what this step reads; make it something plain, such asinvoice. -
Choose the Model.
-
Under Values the step types, choose Add a value, name it
client, and set its Value to the client’s name. It can be typed text, a workflow input, or a secret — a password or key stored so it never shows in a log. -
Under Steps on the desktop, use Add a desktop step to add, in order:
- Open an app. On a Mac, fill in App, or pick it with Choose an app…. On Windows, fill in Program with the program’s path, or pick it with Choose a program….
- Do a task, with The task, in plain words set to
Open the invoice list and find the newest row for %client% - Read from the screen, with What to read set to
The invoice number and the total in that row, and two values under Values to read:numberwith Type set to Text, andtotalwith Type set to Number
-
Choose Test, take your hands off the mouse and keyboard, and watch.
-
Add a later step that uses what it read, written as
${steps.invoice.outputs.number}.
In a new workflow, Or start from an example offers Copy data out of a desktop app, which opens an app this computer already has and reads what it shows.
Write a task the model can finish
Section titled “Write a task the model can finish”A website step does one action at a time; a desktop step takes a whole task. The model keeps clicking and typing until the task is done, so write what you want finished, not each click:
Open the invoice list and find the newest row for %client%Create a new invoice for %client% for %amount% and save it as a draftExport this month's sales report as a CSV into the Documents folder
Most actions per task, under Desktop settings, caps how many clicks and keystrokes one task may take. The default is 50, and Most actions for this task (optional) sets a different cap on one task. A task that needs more fails, so either split it or raise the cap.
How much AI decides
Section titled “How much AI decides”A desktop step does not have to ask the model every time. How much AI decides, under Desktop settings, sets that for the whole step, and a single task can set its own:
- Replay; AI fixes what changed (the default) records a task that worked and replays it on later runs. When a screen no longer matches the recording, the model takes over from there and the recording is repaired.
- AI decides every run asks the model for every action. It adapts to whatever the screen shows, and sends a screenshot for each action, every run.
- Replay only, no AI runs from the recording alone. Nothing is sent to a provider and no model is called; a step that can no longer find what it recorded stops and says what changed, rather than improvising.
A recording stays on the computer that made it. On Windows, Pin these steps on the run that learned a task writes it into the step, so every Windows computer can replay it.
A step that uses Replay only, no AI throughout, with no check written as a sentence, needs no model at all. Read from the screen needs the model the first time; on Windows, later runs read the same elements again without it where they can. On macOS it asks the model every run, so do not set it to Replay only, no AI there.
What a desktop step can do
Section titled “What a desktop step can do”The steps inside run in order, on this computer’s screen.
- Open an app starts an app or program. It does not wait for it to close. On a Mac, Run a command instead takes a Command and Arguments · one per line (optional).
- Do a task carries out The task, in plain words.
%name%types one of the values the step types, or an answer you gave earlier. - Read from the screen reads What to read and fills in the values
under Values to read, each with a Name, a Type, and a
Description (optional) that tells the model what it is. Later steps read
each value as
${steps.<identifier>.outputs.<name>}. - Make sure that… fails the step when the screen does not look right. How to check picks how. AI judges a sentence reads The screen should show… and asks the model from a screenshot. Text is on the screen, An element is there, and The window title contains read the front window’s elements with no model; they need Windows. Keep checking for (optional) gives the app time to get there.
- Wait waits for How long you say.
- Take a screenshot saves a PNG of the whole screen with the run’s files, under the Screenshot name you give it.
- Ask me for input shows your Question to show you and pauses until you answer. Use the answer as names the answer so later steps can type it. Other desktop steps may use the screen while it waits.
Every step also has Only if… and time limit, which runs it only when a condition holds and caps how long it may take. A step with neither set takes at most five minutes.
Keep passwords out of the model
Section titled “Keep passwords out of the model”Values the step types holds whatever the step types, named in the task as
%name%. The model only ever sees the name.
For anything sensitive, choose a secret as the value. It stays out of the task, out of the model, and out of the logs. A task that spells out a secret’s value fails rather than send it, and Review & run says so before you run.
Sharing the screen with you
Section titled “Sharing the screen with you”Desktop steps run one at a time: there is one screen, so a second step waits for the first. That holds inside a For each item loop and inside a batch sheet too — the items take turns rather than run together.
Before a step clicks or types, it waits until nobody has used the mouse or
keyboard for five seconds, and it pauses the moment you use them again, so
it never takes the input out from under you.
Wait until nobody has used the mouse or keyboard for, under
Desktop settings, changes that wait; 0 turns it off on a computer
nobody works at.
While a desktop step runs, the Kitewell icon in the menu bar or the system tray turns into a pointer, and the menu leads with each running step — using your computer, paused while you use it, or waiting for another desktop step — followed by Stop, which ends only the runs those steps belong to. Nothing is drawn on top of the screen, because the model would see it in its screenshots and might click it.
What a run looks like
Section titled “What a run looks like”Open the run under Runs & logs. What happened on the desktop lists the steps in order with their screenshots, and says where the step waited for you to stop using the mouse and keyboard, or for another desktop step. Beside them are the Model that was asked and Model usage, the tokens that went in and out.
Ran without AI says how many of the step’s operations ran without asking the model: a replayed task, a check that reads the window itself, or an operation such as opening an app. A replayed action sends nothing to the model.
How a task replays depends on the system:
- On Windows, an action that landed on a button, field, or menu replays on that element wherever it is now, so a moved window or a changed title does not stop it. Anything else replays from the screen, as on macOS.
- On macOS, a replay works from the screen itself: it needs the same screen size, and each screen to look as it did when the task was recorded.
Before a replay counts as a miss, it waits for a recorded element to appear, or for the screen to match, for as long as Wait for elements up to under Desktop settings says: 10 seconds unless set.
When a replay misses, the model takes over from there — or, under Replay only, no AI, the step stops and says what changed. Project settings → Storage → Replay cache clears what a workflow remembers after an app is redesigned. The cache stays on this computer and is not carried in backups.
When the provider asks you to confirm
Section titled “When the provider asks you to confirm”Some model providers stop and ask a person to approve an action, such as a purchase. The step stops with it. When the model provider asks to confirm an action, under Desktop settings, is Stop the step; Go ahead lets those actions run unapproved. The safer pattern is an Ask me for input step before the task, so the decision is yours and is recorded with the run.
If something goes wrong
Section titled “If something goes wrong”Look at the step’s screenshots first. Then:
- The step says it needs a permission. Run Check desktop access again and allow what the row names.
- The screen was locked, or someone else was signed in. Desktop steps need this computer’s screen, unlocked, with you signed in.
- The task ran out of actions. Split it into two tasks, or raise Most actions per task.
- Someone used the mouse or keyboard for the whole time limit, so the step never got the screen. Run it when the computer is free, or give the step a longer time limit.
- The browser asks you to choose a certificate. A desktop step works the browser on your screen, which the client certificates added to Kitewell do not reach. Automate the site with a website step instead.
The rest is in Troubleshooting.
Details
Section titled “Details”Every action the model decides sends a screenshot of the whole screen, other open windows included, to the model’s provider, and is billed by that provider. Close what should not be seen before a run, or use a computer nobody else works at. Actions that replay from memory and checks that read the window’s elements send nothing, and neither do the values the step types or your secrets. Screenshots saved with the run stay on this computer, under the run’s retention. See What leaves your computer.
Desktop steps run on macOS and Windows only, on this computer’s own screen. An app that blocks screen recording cannot be operated, and neither can one running as administrator on Windows while Kitewell is not.
The workflow in Build your first desktop step
is two steps: Automate a desktop app with one value named client, an
Open an app step that starts Numbers, a Do a task step that finds the
newest row for that client, and a Read from the screen step that reads the
invoice number and the total; then a later step that uses those two values.
On Windows, Open an app takes the program’s name instead, such as
notepad.exe, or the program and what to pass to it.